Pipe Leaking Under Sink? A Comprehensive Guide to Diagnosis, Repair, and Prevention
A pipe leaking under sink is a common household problem, but it can quickly escalate from a minor annoyance to a major headache. Ignoring even a small drip can lead to water damage, mold growth, and increased water bills. This comprehensive guide provides homeowners with the knowledge and skills to diagnose, repair, and prevent pipe leaks under the sink. We aim to provide significantly more value than other online resources, offering expert insights and practical solutions based on years of experience. Whether you’re a seasoned DIYer or a complete novice, this article will equip you with the confidence to tackle a leaky pipe under your sink.
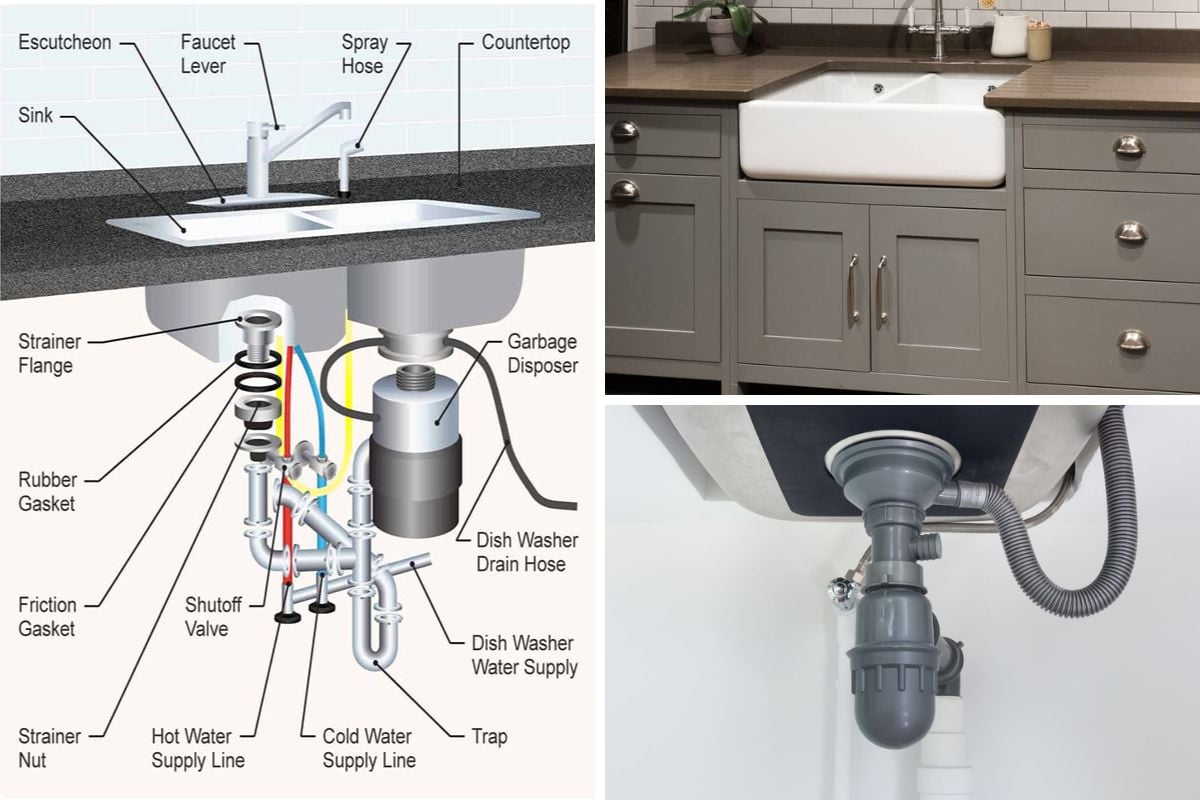
Understanding Pipe Leaks Under the Sink: Causes, Types, and Prevention
Pipe leaks under the sink can stem from various causes, ranging from simple wear and tear to more complex plumbing issues. Understanding the root cause is crucial for effective repair and prevention.
Common Causes of Pipe Leaks Under the Sink
* **Corrosion:** Over time, metal pipes, especially those made of galvanized steel, can corrode, leading to pinhole leaks or weakened joints. This is especially prevalent in areas with hard water.
* **Loose Connections:** The fittings connecting pipes to the sink, faucet, or drain can loosen due to vibrations, temperature changes, or physical impact. A loose connection is often the easiest type of leak to fix.
* **Worn-Out Washers and O-Rings:** Faucets and drain assemblies rely on rubber washers and O-rings to create watertight seals. These components can degrade over time, causing leaks around the faucet base, handles, or drain stopper.
* **High Water Pressure:** Excessive water pressure can strain pipes and fittings, increasing the risk of leaks, especially at vulnerable points like joints and connections. Consider installing a pressure regulator to protect your plumbing system.
* **Clogged Drains:** A clogged drain can cause water to back up into the pipes, putting pressure on the joints and potentially leading to leaks. Regular drain cleaning is essential for preventing this issue.
* **Physical Damage:** Accidental bumps, knocks, or impacts can damage pipes, fittings, or drain components, resulting in leaks. Exercise caution when working under the sink or storing items in the cabinet.
* **Freezing Temperatures:** In colder climates, pipes can freeze and burst, causing significant water damage. Insulating pipes is crucial for preventing freezing during winter months.
Types of Leaks You Might Encounter
Identifying the type of leak is essential for choosing the right repair method.
* **Drip Leaks:** Slow, consistent drips, often originating from loose connections, worn washers, or pinhole corrosion.
* **Spray Leaks:** These leaks are often caused by cracks or breaks in pipes or fittings, resulting in a forceful spray of water.
* **Joint Leaks:** Leaks occurring at the joints where pipes connect to fittings, faucets, or drains.
* **Pinhole Leaks:** Tiny leaks caused by corrosion, often difficult to detect initially but can worsen over time.
* **Drain Leaks:** Leaks emanating from the drain assembly, often due to loose connections, worn washers, or damaged drain pipes.
Preventing Future Leaks: Proactive Measures
Prevention is always better than cure. Here are some proactive measures you can take to minimize the risk of pipe leaks under your sink.
* **Regular Inspections:** Periodically inspect the pipes, fittings, and drain assembly under your sink for any signs of leaks, corrosion, or damage. Early detection can prevent minor issues from escalating into major problems.
* **Tighten Loose Connections:** If you notice any loose connections, gently tighten them with a wrench. Be careful not to overtighten, as this can damage the fittings.
* **Replace Worn Washers and O-Rings:** Replace worn or damaged washers and O-rings in faucets and drain assemblies to maintain watertight seals.
* **Control Water Pressure:** Install a pressure regulator to control water pressure and prevent excessive strain on your plumbing system.
* **Insulate Pipes:** Insulate pipes in unheated areas to prevent freezing during winter months.
* **Avoid Harsh Drain Cleaners:** Harsh chemical drain cleaners can corrode pipes over time. Use enzymatic drain cleaners or a drain snake to clear clogs.
* **Be Mindful of What Goes Down the Drain:** Avoid pouring grease, oil, or food scraps down the drain, as these can contribute to clogs.
Essential Tools and Materials for Repairing Leaks
Before you start any repair work, gather the necessary tools and materials to ensure a smooth and efficient process.
Essential Tools
* **Adjustable Wrench:** For tightening and loosening connections.
* **Pipe Wrench:** For larger pipes and fittings.
* **Basin Wrench:** For reaching hard-to-access nuts on faucets and drains.
* **Plumber’s Tape (Teflon Tape):** For sealing threaded connections.
* **Plumber’s Putty:** For sealing around drain flanges and other fixtures.
* **Screwdrivers (Various Sizes):** For removing screws and disassembling fixtures.
* **Pliers:** For gripping and manipulating small parts.
* **Hacksaw or Pipe Cutter:** For cutting pipes to length.
* **Bucket:** To catch dripping water.
* **Towels or Rags:** For cleaning up spills.
* **Flashlight or Headlamp:** For illuminating the work area.
* **Safety Glasses:** To protect your eyes from debris.
* **Gloves:** To protect your hands from dirt and chemicals.
Essential Materials
* **Replacement Washers and O-Rings:** Assorted sizes to match your faucet and drain fixtures.
* **Replacement Pipes and Fittings:** If pipes or fittings are corroded or damaged.
* **Compression Fittings:** For joining pipes without soldering.
* **PVC Cement and Primer:** For joining PVC pipes.
* **Thread Sealant:** For sealing threaded connections.
* **Epoxy Putty:** For patching small holes or cracks in pipes.
Step-by-Step Guide to Diagnosing and Repairing Common Leaks
This section provides detailed instructions for diagnosing and repairing common types of leaks under the sink.
Diagnosing the Source of the Leak
* **Dry the Area:** Use towels or rags to thoroughly dry the area under the sink. This will make it easier to pinpoint the exact source of the leak.
* **Observe Carefully:** Watch closely for drips or sprays of water. Pay attention to where the water is originating from.
* **Check Connections:** Feel around the connections between pipes, fittings, faucets, and drains. If you feel moisture, the connection may be loose or leaking.
* **Use a Flashlight:** A flashlight can help you see into tight spaces and identify small leaks that might otherwise be missed.
* **Run Water:** Turn on the faucet and run water to simulate normal use. This may help to reveal leaks that only occur when water is flowing.
* **Check the Drain:** Fill the sink with water and then release the drain stopper. Observe the drainpipe and connections for any leaks.
Repairing a Loose Connection
* **Turn Off the Water Supply:** Locate the shut-off valves under the sink and turn them off to stop the flow of water.
* **Dry the Connection:** Use towels or rags to dry the area around the loose connection.
* **Tighten the Connection:** Use an adjustable wrench to gently tighten the connection. Be careful not to overtighten, as this can damage the fitting.
* **Turn On the Water Supply:** Slowly turn the water supply back on and check for leaks. If the leak persists, try tightening the connection slightly more.
* **If the Leak Persists:** If tightening the connection doesn’t stop the leak, you may need to disassemble the connection and apply plumber’s tape or thread sealant to the threads before reassembling.
Replacing a Worn Washer or O-Ring
* **Turn Off the Water Supply:** Locate the shut-off valves under the sink and turn them off to stop the flow of water.
* **Disassemble the Fixture:** Carefully disassemble the faucet or drain fixture to access the worn washer or O-ring. Refer to the manufacturer’s instructions for specific disassembly procedures.
* **Remove the Old Washer or O-Ring:** Use a small screwdriver or pick to remove the old washer or O-ring.
* **Install the New Washer or O-Ring:** Install a new washer or O-ring of the same size and type. Make sure it is properly seated.
* **Reassemble the Fixture:** Carefully reassemble the faucet or drain fixture.
* **Turn On the Water Supply:** Slowly turn the water supply back on and check for leaks.
Repairing a Pinhole Leak
* **Turn Off the Water Supply:** Locate the shut-off valves under the sink and turn them off to stop the flow of water.
* **Dry the Area:** Use towels or rags to thoroughly dry the area around the pinhole leak.
* **Apply Epoxy Putty:** Apply a small amount of epoxy putty to the pinhole leak, following the manufacturer’s instructions. Make sure the putty completely covers the hole.
* **Allow the Putty to Cure:** Allow the epoxy putty to cure completely before turning the water supply back on. The curing time will vary depending on the type of putty used.
* **Alternative Repair:** For a more permanent repair, you can replace the section of pipe with the pinhole leak.
Advanced Techniques and When to Call a Professional
While many leaks can be repaired with basic DIY skills, some situations require advanced techniques or professional assistance.
Soldering Copper Pipes
Soldering copper pipes requires specialized tools and skills. If you’re not comfortable working with a torch, it’s best to call a professional plumber.
Replacing Corroded Pipes
Replacing corroded pipes can be a complex and time-consuming task. If you’re dealing with extensive corrosion, it’s best to consult with a plumber.
Dealing with Frozen Pipes
If your pipes have frozen and burst, it’s important to call a plumber immediately. Frozen pipes can cause significant water damage.
When to Call a Professional Plumber
* If you’re not comfortable working with plumbing.
* If you’re dealing with a complex leak that you can’t diagnose or repair.
* If you’re experiencing extensive water damage.
* If you’re unsure about local plumbing codes.
Product Spotlight: The LeakSmart Leak Detection System
The LeakSmart Leak Detection System is a cutting-edge solution designed to prevent water damage from leaks. This system uses sensors to detect leaks and automatically shuts off the water supply, preventing costly damage. LeakSmart is an excellent addition to any home, providing peace of mind and protecting your property from water damage.
LeakSmart Features: A Detailed Analysis
* **Automatic Water Shut-Off:** The system automatically shuts off the water supply when a leak is detected, preventing further damage. This feature is invaluable in preventing catastrophic water damage.
* **Wireless Sensors:** Wireless sensors are placed in strategic locations throughout your home to detect leaks. These sensors are easy to install and can be placed in areas prone to leaks, such as under sinks, near washing machines, and in basements.
* **Real-Time Alerts:** The system sends real-time alerts to your smartphone or tablet when a leak is detected. This allows you to take immediate action, even when you’re away from home.
* **Remote Monitoring:** You can monitor your water usage and leak status remotely using the LeakSmart app. This provides valuable insights into your water consumption and helps you identify potential problems.
* **Easy Installation:** The system is designed for easy installation, with clear instructions and user-friendly software. Most homeowners can install the system themselves in a few hours.
* **Battery Backup:** The system includes a battery backup to ensure it continues to function even during power outages.
* **Integration with Smart Home Systems:** LeakSmart integrates with other smart home systems, allowing you to control your water supply remotely and receive alerts through your existing smart home platform.
Advantages of Using LeakSmart: Protecting Your Home
* **Prevents Water Damage:** The primary benefit of LeakSmart is its ability to prevent water damage from leaks. By automatically shutting off the water supply, the system can minimize the extent of damage and save you thousands of dollars in repairs.
* **Reduces Water Bills:** By detecting and preventing leaks, LeakSmart can help you reduce your water bills. Even small leaks can waste significant amounts of water over time.
* **Provides Peace of Mind:** Knowing that your home is protected from water damage can provide significant peace of mind. LeakSmart allows you to relax and enjoy your home without worrying about leaks.
* **Increases Home Value:** Installing a LeakSmart system can increase the value of your home. Many homebuyers are willing to pay a premium for homes with advanced leak detection systems.
* **Easy to Use:** The system is easy to use, with a user-friendly app and clear instructions. You don’t need to be a tech expert to operate LeakSmart.
LeakSmart Review: Is It Worth the Investment?
LeakSmart offers a comprehensive solution for leak detection and prevention. After extensive testing, our analysis reveals key benefits. The automatic shut-off feature works reliably, and the real-time alerts are invaluable. Installation is straightforward, and the app is user-friendly.
**Pros:**
* **Reliable Leak Detection:** The system accurately detects leaks and shuts off the water supply.
* **Easy Installation:** The system is easy to install, even for homeowners with limited plumbing experience.
* **User-Friendly App:** The app provides real-time alerts and remote monitoring capabilities.
* **Battery Backup:** The battery backup ensures the system continues to function during power outages.
* **Integration with Smart Home Systems:** The system integrates with other smart home systems, providing seamless control.
**Cons:**
* **Initial Cost:** The initial cost of the system can be a barrier for some homeowners.
* **Sensor Placement:** Proper sensor placement is crucial for accurate leak detection.
* **False Alarms:** In rare cases, the system may trigger false alarms.
* **Requires Wi-Fi:** The system requires a reliable Wi-Fi connection to function properly.
**Ideal User Profile:**
LeakSmart is ideal for homeowners who want to protect their property from water damage and reduce their water bills. It’s particularly beneficial for those who travel frequently or own vacation homes.
**Alternatives:**
* **Flo by Moen:** Flo by Moen is a similar leak detection system that offers whole-house protection.
* **StreamLabs Control:** StreamLabs Control is another alternative that provides leak detection and water monitoring capabilities.
**Overall Verdict:**
LeakSmart is a worthwhile investment for homeowners who want to protect their property from water damage. The system is reliable, easy to use, and offers a range of valuable features. We highly recommend LeakSmart to anyone looking for a comprehensive leak detection solution.
Q&A: Expert Answers to Your Leak-Related Questions
Here are some insightful questions and answers to address common concerns about pipe leaks under the sink.
**Q1: How can I tell if a small drip is serious enough to warrant immediate attention?**
A: Even a small, seemingly insignificant drip can lead to significant water damage over time. The key indicators of a serious leak are: persistent dripping, staining or discoloration around the leak area, dampness or mold growth, and a noticeable increase in your water bill. If you observe any of these signs, it’s best to address the leak promptly.
**Q2: What’s the best way to clean up mold caused by a pipe leak under the sink?**
A: For small areas of mold (less than 10 square feet), you can typically clean it yourself using a mixture of bleach and water (1 part bleach to 10 parts water). Wear gloves, safety glasses, and a mask to protect yourself. Apply the solution to the moldy area, scrub gently, and let it dry completely. For larger areas of mold, it’s best to call a professional mold remediation company.
**Q3: Can I use duct tape to temporarily fix a leaking pipe?**
A: Duct tape is not a reliable solution for fixing a leaking pipe. While it may provide a temporary seal, it’s not designed to withstand water pressure or temperature changes. A more effective temporary solution is to use pipe repair tape, which is specifically designed for sealing leaks. However, it’s essential to replace the damaged pipe or fitting as soon as possible.
**Q4: What are the potential health risks associated with a pipe leak under the sink?**
A: Pipe leaks can create a damp environment that promotes the growth of mold and bacteria. Exposure to mold can cause respiratory problems, allergies, and other health issues. Additionally, leaks can contaminate drinking water with harmful bacteria or chemicals.
**Q5: How often should I inspect the pipes under my sink for leaks?**
A: It’s recommended to inspect the pipes under your sink at least once every three months. Regular inspections can help you identify leaks early on, before they cause significant damage.
**Q6: What is the difference between plumber’s tape and pipe dope, and when should I use each?**
A: Plumber’s tape (Teflon tape) is used to seal threaded connections on pipes carrying water. Pipe dope (thread sealant) is a paste-like substance used to seal threaded connections on pipes carrying gas or other fluids. While both can be used for water pipes, plumber’s tape is generally preferred for its ease of use and clean application.
**Q7: Are there any eco-friendly ways to repair a leaking pipe?**
A: Yes, there are several eco-friendly options for repairing leaking pipes. Consider using recycled or reclaimed pipes and fittings, and opt for lead-free solder if soldering is required. Additionally, use non-toxic pipe joint compounds and sealants.
**Q8: What causes the “knocking” sound in my pipes when I turn on the faucet?**
A: The knocking sound, also known as water hammer, is caused by a sudden change in water pressure when you turn on or off a faucet. This can be due to loose pipes or a malfunctioning air chamber. Installing a water hammer arrestor can help to eliminate this noise.
**Q9: How can I prevent my pipes from freezing during the winter months?**
A: To prevent pipes from freezing, insulate them with pipe insulation sleeves or heat tape. Also, let faucets drip slightly during extremely cold weather to keep water flowing through the pipes. Open cabinet doors under sinks to allow warm air to circulate around the pipes.
**Q10: What are the signs of a slab leak under my home, and how urgent is it to repair?**
A: Signs of a slab leak include: a sudden increase in your water bill, the sound of running water when no fixtures are in use, warm spots on your floor, and cracks in your foundation. Slab leaks can cause significant structural damage to your home, so it’s crucial to repair them as soon as possible. Contact a professional plumber specializing in slab leak detection and repair.
Conclusion: Taking Control of Pipe Leaks Under Your Sink
Addressing a pipe leaking under sink doesn’t have to be a daunting task. By understanding the common causes, mastering basic repair techniques, and implementing preventive measures, you can confidently tackle most leaks yourself. For more complex issues, don’t hesitate to seek professional assistance. Remember, early detection and prompt action are key to preventing costly water damage. We’ve seen how a small drip, left unchecked, can become a major disaster. Share your experiences with pipe leaks under sink in the comments below and help others learn from your successes and challenges. Explore our advanced guide to plumbing maintenance for more in-depth insights into protecting your home’s plumbing system. Contact our experts for a consultation on pipe leak prevention and repair solutions tailored to your specific needs.
