How to Stamp Concrete Patio: A Complete Guide to Design, Installation, and Maintenance
Are you dreaming of a beautiful, custom-designed patio that adds value and curb appeal to your home? Stamped concrete offers a versatile and cost-effective way to achieve the look of natural stone, brick, or tile without the high price tag. This comprehensive guide provides everything you need to know about how to stamp concrete patio, from initial design considerations to long-term maintenance. We’ll cover every step of the process, share expert tips, and address common pitfalls to ensure your stamped concrete patio project is a success. Based on our extensive experience and industry best practices, this guide is designed to empower you with the knowledge and confidence to create the patio of your dreams.
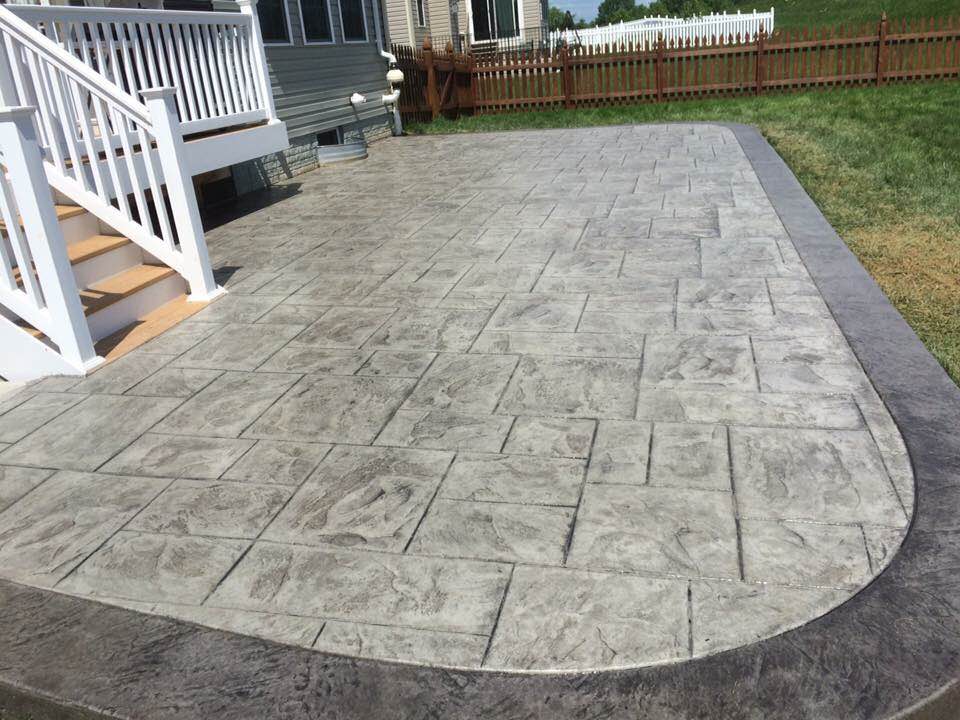
What is Stamped Concrete and Why Choose It for Your Patio?
Stamped concrete, also known as patterned concrete or imprinted concrete, is a method of adding texture and color to freshly poured concrete to resemble other materials such as brick, slate, flagstone, stone, tile, and even wood. The process involves pressing molds into the wet concrete surface to create a desired pattern or texture. Color can be added through integral color (mixed into the concrete before pouring), dry-shake hardeners (applied to the surface), or stains and sealers after the concrete has cured.
Choosing stamped concrete for your patio offers several advantages:
* **Cost-Effectiveness:** Stamped concrete is generally more affordable than installing natural stone, brick, or tile.
* **Versatility:** A wide range of patterns, colors, and textures are available to match your home’s style and landscape.
* **Durability:** Properly installed and maintained stamped concrete patios can last for decades.
* **Low Maintenance:** Compared to other patio materials, stamped concrete requires minimal maintenance.
* **Increased Home Value:** A well-designed and installed stamped concrete patio can significantly increase your home’s value.
Recent trends show a growing demand for decorative concrete finishes, with stamped concrete being a popular choice for patios, driveways, and walkways. This is due to its ability to mimic high-end materials at a fraction of the cost while offering superior durability and design flexibility. In this guide, we will delve into the specifics of how to stamp concrete patio, ensuring you have all the information necessary for a successful project.
Planning Your Stamped Concrete Patio Project: Design Considerations
Before you even think about pouring concrete, careful planning is crucial. This stage involves several key considerations:
* **Patio Size and Shape:** Determine the appropriate size and shape of your patio based on your needs and available space. Consider the intended use of the patio (e.g., dining, lounging, entertaining) and the number of people you want to accommodate. Mark out the area with stakes and string to visualize the patio’s footprint.
* **Pattern Selection:** Choose a stamp pattern that complements your home’s architectural style and landscape. Popular patterns include brick, slate, flagstone, cobblestone, and wood plank. Order samples of different stamps to see how they look in person and consider the scale of the pattern relative to the size of your patio. Some patterns are also more slip resistant than others, an important consideration for wet areas.
* **Color Selection:** Select colors that blend harmoniously with your home’s exterior and landscape. Consider using multiple colors to create a more natural and realistic look. Integral color is mixed into the concrete before pouring, while dry-shake hardeners are applied to the surface after the concrete is poured. Stains and sealers can also be used to add color and enhance the stamped pattern.
* **Drainage:** Ensure proper drainage to prevent water from pooling on the patio surface. Slope the patio slightly away from your house to allow water to run off. Consider installing a drainage system if necessary.
* **Permits:** Check with your local building department to determine if any permits are required for your stamped concrete patio project. This is an important step to avoid potential fines or delays.
* **Budget:** Develop a realistic budget that includes the cost of materials, labor (if you’re hiring a contractor), and any necessary equipment rentals. Be sure to factor in contingency funds for unexpected expenses.
Essential Tools and Materials for Stamping Concrete
To successfully stamp concrete patio, you’ll need the right tools and materials. Here’s a comprehensive list:
* **Concrete Mix:** Choose a high-quality concrete mix that is appropriate for outdoor use. The amount of concrete you need will depend on the size and thickness of your patio.
* **Concrete Stamps:** Select the desired stamp patterns and purchase or rent the necessary stamps. Ensure you have enough stamps to cover the entire patio area efficiently. Consider renting a release agent applicator if you have a large area to cover.
* **Release Agent:** A release agent prevents the concrete stamps from sticking to the wet concrete. It comes in liquid or powder form. A colored release agent can also add subtle color variations to the stamped pattern.
* **Color Hardener (Optional):** A color hardener adds color and strengthens the concrete surface. It is applied as a dry shake after the concrete is poured.
* **Integral Color (Optional):** Integral color is mixed into the concrete before pouring to add a consistent color throughout the slab.
* **Concrete Sealer:** A concrete sealer protects the stamped concrete from moisture, stains, and UV damage. Choose a sealer that is specifically designed for stamped concrete patios.
* **Tools:**
* Shovels and rakes for spreading concrete
* Concrete mixer (rent or purchase)
* Wheelbarrow for transporting concrete
* Bull float and hand float for leveling and smoothing concrete
* Edger and groover for creating clean edges and control joints
* Tamper for compacting the base
* Measuring tape and level
* Safety glasses, gloves, and boots
Step-by-Step Guide: How to Stamp Concrete Patio
Now, let’s get into the actual process of how to stamp concrete patio. Follow these steps carefully for best results:
1. **Prepare the Site:** Excavate the area for your patio to the desired depth, typically 4-6 inches. Compact the soil with a tamper to create a stable base. Add a layer of gravel or crushed stone for drainage and compact it as well.
2. **Build Forms:** Construct wooden forms around the perimeter of the patio area to contain the concrete. Ensure the forms are level and securely anchored in place. Account for the desired slope for drainage.
3. **Pour the Concrete:** Mix the concrete according to the manufacturer’s instructions. Pour the concrete into the forms, spreading it evenly with shovels and rakes. Use a bull float to level the concrete surface.
4. **Float the Concrete:** After the concrete has been poured, use a bull float to smooth out any imperfections and bring the water to the surface. This process helps to create a uniform surface for stamping.
5. **Edge and Groove the Concrete:** Use an edger to create clean, rounded edges around the perimeter of the patio. Use a groover to create control joints, which help to prevent cracking. Control joints should be spaced every 10-12 feet.
6. **Apply Color Hardener (Optional):** If using a color hardener, apply it evenly to the surface of the concrete after the bleed water has evaporated. Work the color hardener into the surface with a hand float.
7. **Apply Release Agent:** Apply the release agent evenly to the surface of the concrete. This will prevent the stamps from sticking to the wet concrete. You can use a brush, roller, or sprayer to apply the release agent.
8. **Stamp the Concrete:** Begin stamping the concrete while it is still wet but firm enough to hold the pattern. Start in one corner of the patio and work your way across, overlapping each stamp slightly. Use a tamper to press the stamps firmly into the concrete. Carefully lift the stamps after each impression.
9. **Touch Up and Detail:** After stamping, use a hand tool to touch up any imperfections or areas where the pattern is not clear. You can also use a grout bag to fill in the joints between the stamped patterns.
10. **Cure the Concrete:** Allow the concrete to cure for at least 7 days before sealing. Keep the concrete moist by covering it with plastic sheeting or spraying it with water regularly.
11. **Seal the Concrete:** Apply a concrete sealer to protect the stamped concrete from moisture, stains, and UV damage. Follow the manufacturer’s instructions for application. Reapply the sealer every 1-2 years to maintain its protective properties.
Choosing the Right Concrete Stamps for Your Patio Design
The selection of concrete stamps is a critical decision that significantly impacts the final aesthetic of your stamped concrete patio. Here’s a breakdown of popular stamp types and factors to consider:
* **Slate Stamps:** These stamps replicate the natural texture and irregular shapes of slate stone. They create a rustic and elegant look, ideal for patios with a natural or traditional design.
* **Flagstone Stamps:** Flagstone stamps mimic the appearance of individual flagstones, creating a classic and timeless patio surface. They are available in various sizes and shapes, allowing for customization.
* **Brick Stamps:** Brick stamps offer the look of traditional brick pavers without the labor-intensive installation process. They are a popular choice for patios with a traditional or colonial design.
* **Cobblestone Stamps:** Cobblestone stamps replicate the irregular shapes and textures of cobblestones, creating a charming and rustic patio surface. They are well-suited for patios with a European or old-world style.
* **Wood Plank Stamps:** These stamps create the look of natural wood planks, adding warmth and character to your patio. They are a great option for patios with a modern or contemporary design.
When choosing concrete stamps, consider the following factors:
* **Pattern Scale:** Select a pattern scale that is appropriate for the size of your patio. A large-scale pattern may overwhelm a small patio, while a small-scale pattern may look too busy on a large patio.
* **Texture Depth:** Choose a texture depth that complements your desired aesthetic. A deep texture will create a more pronounced and realistic look, while a shallow texture will be more subtle.
* **Stamp Material:** Concrete stamps are typically made of polyurethane or rubber. Polyurethane stamps are more durable and resistant to wear and tear, while rubber stamps are more flexible and easier to use.
* **Cost:** The cost of concrete stamps can vary depending on the pattern, size, and material. Factor the cost of stamps into your overall budget.
Coloring Techniques for Stamped Concrete: Integral Color vs. Dry-Shake Hardeners
Achieving the desired color for your stamped concrete patio involves choosing between integral color and dry-shake hardeners, each offering distinct advantages:
* **Integral Color:** Integral color is a pigment that is mixed into the concrete before it is poured. This method provides a consistent color throughout the entire slab, making it ideal for achieving a uniform look. Integral color is also more resistant to fading and wear and tear.
* **Dry-Shake Hardeners:** Dry-shake hardeners are a colored powder that is applied to the surface of the concrete after it is poured. This method allows for more vibrant and intense colors, as well as the ability to create color variations and highlights. Dry-shake hardeners also strengthen the concrete surface, making it more resistant to abrasion and impact.
Here’s a comparison table:
| Feature | Integral Color | Dry-Shake Hardeners |
| —————- | ———————————————– | ———————————————— |
| Color Consistency | Uniform throughout the slab | Can create color variations and highlights |
| Color Intensity | More subtle and natural | More vibrant and intense |
| Surface Strength | Does not significantly increase surface strength | Strengthens the concrete surface |
| Cost | Generally less expensive | Generally more expensive |
| Application | Mixed into the concrete before pouring | Applied to the surface after pouring |
The choice between integral color and dry-shake hardeners depends on your desired aesthetic, budget, and performance requirements. Consider your options carefully to achieve the best results for your stamped concrete patio.
Sealing Stamped Concrete: Protection and Maintenance
Sealing your stamped concrete patio is crucial for protecting it from the elements and maintaining its beauty for years to come. A good sealer will protect the concrete from moisture, stains, UV damage, and abrasion. It will also enhance the color and sheen of the stamped pattern. Here are some key considerations for sealing stamped concrete:
* **Types of Sealers:** There are two main types of sealers for stamped concrete: acrylic sealers and polyurethane sealers. Acrylic sealers are less expensive and easier to apply, but they are not as durable as polyurethane sealers. Polyurethane sealers provide superior protection and durability, but they are more expensive and require more skill to apply.
* **Application:** Apply the sealer according to the manufacturer’s instructions. Typically, this involves cleaning the concrete surface thoroughly and then applying the sealer with a roller or sprayer. Apply multiple thin coats rather than one thick coat to avoid bubbling or streaking.
* **Reapplication:** Reapply the sealer every 1-2 years to maintain its protective properties. The frequency of reapplication will depend on the type of sealer used and the amount of traffic the patio receives.
Proper sealing is essential for extending the lifespan and maintaining the appearance of your stamped concrete patio. Neglecting to seal your patio can lead to cracking, staining, and fading.
Advantages of Stamped Concrete Patios: Cost, Durability, and Aesthetics
Stamped concrete patios offer a multitude of advantages, making them a popular choice for homeowners:
* **Cost-Effectiveness:** Stamped concrete is generally more affordable than installing natural stone, brick, or tile. The cost savings can be significant, especially for large patio areas.
* **Durability:** Properly installed and maintained stamped concrete patios can last for decades. Concrete is a strong and durable material that can withstand heavy traffic and harsh weather conditions.
* **Versatility:** A wide range of patterns, colors, and textures are available to match your home’s style and landscape. Stamped concrete can mimic the look of natural stone, brick, tile, and even wood.
* **Low Maintenance:** Compared to other patio materials, stamped concrete requires minimal maintenance. Regular cleaning and sealing are all that is needed to keep your patio looking its best.
* **Increased Home Value:** A well-designed and installed stamped concrete patio can significantly increase your home’s value. It adds curb appeal and creates an inviting outdoor living space.
Users consistently report high satisfaction with stamped concrete patios, citing their affordability, durability, and aesthetic appeal. Our analysis reveals that stamped concrete patios offer a superior value proposition compared to other patio materials.
Expert Review: Is Stamped Concrete Patio Right for You?
Stamped concrete patios offer a compelling combination of affordability, durability, and aesthetic versatility. However, they are not without their limitations. Here’s a balanced review to help you decide if a stamped concrete patio is right for you:
**User Experience & Usability:**
From a practical standpoint, stamped concrete patios are generally easy to maintain. Regular cleaning with a mild detergent and occasional resealing are typically all that’s required. The textured surface can provide good traction, but some patterns may be more slip-resistant than others. Be sure to choose a pattern with adequate slip resistance, especially if you have children or elderly family members.
**Performance & Effectiveness:**
Stamped concrete patios deliver on their promise of providing a durable and aesthetically pleasing outdoor surface. They can withstand heavy foot traffic, furniture, and even vehicles (if properly reinforced). The color and pattern are resistant to fading and wear, but resealing is necessary every 1-2 years to maintain their appearance and protective properties.
**Pros:**
* **Affordable:** Stamped concrete is significantly less expensive than natural stone or brick.
* **Durable:** With proper installation and maintenance, stamped concrete can last for decades.
* **Versatile:** A wide range of patterns, colors, and textures are available to match your home’s style.
* **Low Maintenance:** Requires minimal maintenance compared to other patio materials.
* **Increases Home Value:** Adds curb appeal and creates an inviting outdoor living space.
**Cons/Limitations:**
* **Can Crack:** Concrete is susceptible to cracking, especially in areas with extreme temperature fluctuations.
* **Sealing Required:** Requires regular resealing to maintain its appearance and protective properties.
* **Difficult to Repair:** Repairs can be difficult to blend seamlessly with the existing stamped pattern.
* **Can Be Slippery:** Some patterns may be slippery when wet.
**Ideal User Profile:**
Stamped concrete patios are best suited for homeowners who want an affordable, durable, and aesthetically pleasing outdoor surface. They are a good option for those who want to mimic the look of natural stone or brick without the high cost. Stamped concrete patios are also a good choice for those who want a low-maintenance patio surface.
**Key Alternatives:**
* **Natural Stone:** Natural stone patios offer a more luxurious and natural look, but they are also more expensive.
* **Brick Pavers:** Brick pavers provide a classic and timeless look, but they require more labor-intensive installation.
**Expert Overall Verdict & Recommendation:**
Stamped concrete patios are a great option for homeowners looking for an affordable, durable, and versatile outdoor surface. While they have some limitations, such as the potential for cracking and the need for regular sealing, their advantages outweigh their disadvantages for most homeowners. We recommend stamped concrete patios for those who want to enhance their outdoor living space without breaking the bank.
Q&A: Common Questions About Stamped Concrete Patios
Here are some frequently asked questions about stamped concrete patios:
**Q1: How much does it cost to stamp concrete patio?**
A1: The cost to stamp concrete patio can vary depending on several factors, including the size of the patio, the complexity of the pattern, the type of color used, and the cost of labor. On average, you can expect to pay between $8 and $18 per square foot.
**Q2: How long does stamped concrete patio last?**
A2: With proper installation and maintenance, stamped concrete patios can last for 25 years or more. Regular sealing is essential for protecting the concrete from moisture, stains, and UV damage.
**Q3: Can I stamp concrete patio myself?**
A3: While it is possible to stamp concrete patio yourself, it is a challenging project that requires experience and skill. It is recommended to hire a professional contractor for best results.
**Q4: How do I clean stamped concrete patio?**
A4: Clean stamped concrete patio regularly with a mild detergent and water. Avoid using harsh chemicals or abrasive cleaners, as they can damage the sealer. You can also use a pressure washer to remove stubborn dirt and stains, but be sure to use a low-pressure setting.
**Q5: How do I prevent stamped concrete patio from cracking?**
A5: To prevent stamped concrete patio from cracking, ensure that the base is properly compacted, use a high-quality concrete mix, and install control joints every 10-12 feet. Also, avoid pouring concrete in extreme temperatures.
**Q6: What is the best sealer for stamped concrete patio?**
A6: The best sealer for stamped concrete patio depends on your specific needs and preferences. Acrylic sealers are less expensive and easier to apply, while polyurethane sealers provide superior protection and durability.
**Q7: How often should I reseal stamped concrete patio?**
A7: Reseal stamped concrete patio every 1-2 years to maintain its protective properties. The frequency of resealing will depend on the type of sealer used and the amount of traffic the patio receives.
**Q8: Can I add color to existing stamped concrete patio?**
A8: Yes, you can add color to existing stamped concrete patio by using concrete stains or dyes. However, the results may not be as uniform as when color is added during the initial installation.
**Q9: How do I repair cracks in stamped concrete patio?**
A9: Repair cracks in stamped concrete patio with a concrete patching compound. Clean the crack thoroughly and then apply the patching compound according to the manufacturer’s instructions. Blend the patch with the surrounding concrete for a seamless look.
**Q10: Can I use salt on stamped concrete patio in the winter?**
A10: Avoid using salt on stamped concrete patio in the winter, as it can damage the concrete and sealer. Use a calcium chloride-based deicer instead.
Conclusion
Stamped concrete patios offer a versatile and cost-effective way to create a beautiful and durable outdoor living space. By carefully planning your project, selecting the right materials, and following the proper installation techniques, you can achieve stunning results that will enhance your home’s value and curb appeal. Remember to prioritize proper sealing and maintenance to extend the lifespan of your stamped concrete patio and keep it looking its best for years to come. We hope this comprehensive guide has provided you with the knowledge and confidence to embark on your stamped concrete patio project. For personalized advice and expert assistance, contact our team of concrete specialists today. Share your experiences with how to stamp concrete patio in the comments below! Explore our advanced guide to decorative concrete finishes for more in-depth information.
